Tech-Tip - V6 Exhaust Manifold Repair & Porting...
by Ron Dittmer - Revised February 2002
Refer to article "Exhaust Manifolds" on how to remove,
repair, and install the manifolds. This article covers the porting process
alone.
The stock Pontiac Fiero 2.8 liter V6 engine's exhaust manifolds had a
fabrication process which introduced undesired exhaust gas flow restrictions.
Removing the restrictions increase the engine's horsepower. How much more power
seems to vary pending who you talk to. The following was an experiment performed
by a racing team. They ran an unmodified stock V6 Fiero on a dynamometer to
measure it's horsepower. Then they removed the restrictive material in the
exhaust manifolds, and measured horsepower again, noting an increase of 8hp. The
experiment was performed on only one V6-Fiero. The point emphasized here is the
amount of improvement is likely to vary from car to car, and also pending other
modifications from stock.
There are two types of manifold restriction. With manifolds in-hand, look inside
one of the two "T" junction ports. You will see the slots in the main
tube. That slot material is one type of restriction. The 2nd type is present in
all 3 ports. Put your finger inside any of the three ports, and feel for a
raised welded bead at the opening where the tube itself is welded to the flange.
If you measure the holes in the engine head, and compare that dimension to the
inside diameter of a clean manifold tube, you will note them to be about the
same. The restriction is the weld bead at the edge of the hole. Depending on the
weld bead size, you'll have a "DECREASED" diameter between 1/8"
and 1/4".
Before removing any material, first do all reinforcing welding. Grinding down
the weld beads will weaken the pipe-to-flange joint. Adding a continuous weld
bead around the outer perimeter will strengthen the joint.
There is a definite procedure on welding the manifold. To insure a good weld,
first remove the rust off all flanges by soaking in CLR or Muriatic Acid.
Muriatic Acid is sold in home improvement and hardware stores for under $4 per
gallon. It works extremely fast and cheap compared to household CLR type
products at 10 times the price per ounce. More precaution is to be used with the
acid.
During the welding and cooling process, the manifolds MUST be mounted to
something flat and solid. It is preferred to bolt it to an old engine head or
steel block. If you don't fixture the manifold adequately, it will twist during
the welding process from the extreme heat and cooling afterwards. Fixturing also
provides the welder with a clearance required for the manifold mounting bolts,
as bolts are holding the manifold to the welding fixture. The manifold's tubing
is made of stainless steel, so the welding rod should also be of stainless.
Once the manifolds have been weld reinforced, grind away the restricting outer
weld bead and then the inner slots. The removed material at the opening makes
for better access inside. Three tools I know of which will work
"efficiently" for the grinding process are, a router normally used for
wood, a die grinder which requires an air compressor, and a "Dremel"
tool with a flexible shaft accessory. The router and die grinder use a standard
1/4" shank, 3/4" diameter grinding tool. I have found the longest
shank ones at Ace Hardware for around four dollars. The Dremel tool will work
well, but consumes more grinding wheels, and takes a little longer. It's
advantage is that it allows for better final trimming deep inside. Personally, I
use a combination of tools for best efficiency.
When grinding is complete, you can dress up the ground surfaces with a high rpm,
small diameter, rough bristle, wire brush. Cost is around five dollars. This
process smoothes and polishes the modified areas very nicely for further
minimizing exhaust flow resistance.
Original Article:
The Fiero V6 engine is prone to
developing exhaust manifold cracks and leaky manifold gaskets. The function of the
manifolds are to tie the engine to the exhaust system. There is one on each side of the
engine, just below the bank of three spark plugs. Each has three side tubes (or
"Ports" as they are named) that mat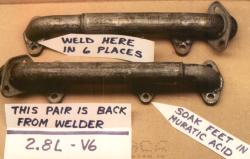 e to the engine head, and one main exit tube, which bolts to the
exhaust crossover pipe. Each engine cylinder uses one dedicated port. Pontiac's sloppy
production methods of the exhaust manifolds have resulted in exhaust flow restrictive
areas, which when removed can increase the horsepower of your V6 by around eight
horsepower.
e to the engine head, and one main exit tube, which bolts to the
exhaust crossover pipe. Each engine cylinder uses one dedicated port. Pontiac's sloppy
production methods of the exhaust manifolds have resulted in exhaust flow restrictive
areas, which when removed can increase the horsepower of your V6 by around eight
horsepower.
Common symptoms for a cracked manifold can be a loud engine exhaust sound, similar to a bad muffler. Another symptom can be a ticking sound from the engine. This sound can give you the impression that the engine itself has an internal problem. In reality, the engine is fine, but the exhaust leak through the crack causes the engine to "tick".
My 86GT V6 engine had a sewing machine sound to it when accelerating, making me think I had a bad valve. After receiving some good advice, and careful examination, I concluded that I must have a crack. I was NOT able to visually see a crack, until after I removed the manifold from the engine.
After I completed my manifold
repairs, the engine ticking noise had gone. The engine sounded like it was a day old.
While I had the manifolds off, I removed obstructive metal inside the manifolds, which
seemed to have added a slightly better sound along with a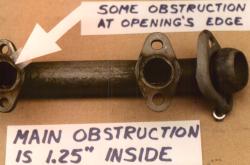 small but noticeable increase
in horsepower. I was thrilled with the results. I would NOT recommend doing all that work
for the horsepower increase alone, but it was certainly worth it, when the manifolds were
off for repairing the cracks.
small but noticeable increase
in horsepower. I was thrilled with the results. I would NOT recommend doing all that work
for the horsepower increase alone, but it was certainly worth it, when the manifolds were
off for repairing the cracks.
After removing both manifolds, I inspected them and their gaskets, finding numerous leaks. Four of the six ports had some sort of leak. Black soot made it easy to diagnose. One port was cracked where the stainless pipe mates to the iron foot. Three ports leaked past the gasket, the result of loose bolts. There was also a crack in one manifold near the crossover pipe fitting. All the leaks surprised me because there was no indication of leakage, other than the engine ticking noise. Engine operation seemed fine. I could not see any soot without first removing the manifolds, so inspecting them prior to removal revealed nothing.
I decided to repair the old
manifolds, rather than buying new ones. After all, I planned to grind out the obstructive
material, then reinforce them by welding ring beads where the stainless pipe meets with
the iron feet. I had the cracks re-welded as well. A welder did all the work on both for
$30.00 total, much less than $170.00 for one new manifold. I gave him the manifolds bolted
to hardwood to minimize foot planarity problems. Also, I soaked the iron feet in muriatic
acid to strip off the rust, insuring a good weld. When I got them back from the welder, I
touched them up with a belt sander to perfect their flatness. My welder was an industrial
machine shop. I asked them to use their standard stainless welding rods. They knew what I
was talking about. When I got them back from the shop, I had to dress up the inside again,
a little. Taking them to the shop before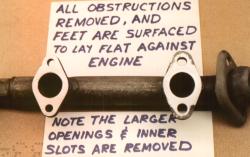 I did any grinding would have been much better.
Be concerned of having an auto repair shop do all this for you. I've heard of $500.00 for replacing one manifold. I don't believe they would be as careful as you either. If you snap a manifold bolt, it is a REAL HASSLE to drill out the stud, but it IS possible to do without removing the engine or other major disassembly. A few mechanics have been known to reassemble everything with the snapped bolt still in place, leaving the manifold susceptible to a gasket failure. If you decide to have someone do this job for you, make sure to inspect all twelve bolts, both before and after the work is done. If you have a missing bolt's hex head, you have a broken or missing bolt. Let your mechanic know that you are aware, and concerned of it.
Something to investigate is a recall on the manifolds. Make sure that your car has none outstanding. If your car has not been in for this, you are in luck. Your problem will be resolved for FREE. Call 1-800-PMCARES, and have your Fiero's VIN number in hand. This is the number on the dash board viewed through the windshield.
TIPS - assuming you have manifold
cracks and/or leaks, and have had all the recalls done.
1. Do not buy new manifolds, but rather re-weld the old ones. Save your money. One thing to note is that my repaired manifolds have around four thousand miles on them. I don't have any history on the long term reliability on re-welded manifolds.
2. Remove the built-in restrictions in the manifolds, and weld them where the pipe meets the feet.
3. If you are doing this yourself, plan on some down time. It is not a fast easy job at all. Well, it was a challenge for me anyway.
4. Use only the high temp manifold gaskets, as specified by Pontiac. Part#10051512. The high temp gasket can be purchased by other sources as well as Pontiac. I bought mine from a NAPA parts store. They cost around twice that of standard gaskets, between $20 and $25, but don't go cheap. You'll be doing this job all over again. The high temp gaskets look different, and are easy to identify, even when installed. If you are concerned that you may have the wrong gaskets on your engine, look at the gasket material that holds the three sections together. You can see it spanning in the air, between the manifold ports. If the spanning gasket material is near an inch wide, and is strait (without any bends), then you have the wrong gasket. The correct gasket has a few strain relief bends in it, between ports. The material width is about a half inch. My guess is that there is a higher content of metal making up the high temp gasket.
5. Plan on reusing the bolts on the difficult/front side. Buy new ones for the trunk side. The trunk side bolts are different, and tend to snap, so take it easy when loosening these. Bolts are part#11509843.
6. The air conditioner compressor will have to be unbolted from the engine. This does NOT involve Freon removal, just lowering the unit onto a frame member. The lower bracket with 2 bolts will have to come out. The upper bracket with three bolts will have to be unbolted from the engine, but NOT detached or even loosened from the compressor itself. Removing the battery will gain you access to these. A ground strap on one of the three bolts must be reattached when done. The top two of the three bolts also hold the black bracket that works with the dog bone. If this bracket loses it's alignment with the engine, loosen the one bolt that is near the dog bone bracket. It helps a lot.
7. While the battery is out, check the battery tray for rust, and use Rustoleom Rusty Metal primer and a good black paint, two coats each.
The balance of the exhaust system stays in place. You remove 6 bolts per manifold that attach them to the engine, and 2 bolts per manifold that attach them to the crossover pipe. Your engine should sound and drive better (much better in my case). Removal of the restrictions might lower underhood temperatures as well as give an estimated eight horsepower increase.
The Procedure
To gain better access to the work area, removing the rear deck lid is well worth the effort. Don't be concerned about removing it because it REALLY IS simple to do. Four bolts, one connector and the grounding wire to the deck shield is all there is. It takes about five minutes to do, and saves a lot of hassle. Reinstalling it is just as easy, EVEN aligning it to the car. Just have someone help in handling the thing. It may be possible to remove the firewall/front side manifold entirely from below, but don't torture yourself. I worked from both top and bottom. Car ramps work great for this job. The manifold by the trunk is accessed from the top only. If you don't break any bolts, it will be very easy. Removing the cooling tubes (on the 85-87's only), and alternator heat shield makes the difference. Disconnect the battery too, so you don't short power to ground at the alternator with a wrench. If you break a bolt during removal, or if you find that you have broken bolts (somewhat common), there are some tools that you will need that will be helpful. 2 of these parts are available from Kentmore tools at 1-800-345-2233. Drill bushing #J38782-1, Drill fixture #J38782-2. These are approx. $29.00, and will make it easy to remove broken bolts. You will also need a #3 screw extractor, 3 each. hold down bolts M8x1.25x40mm, and a "best you can buy" 5/32 drill bit. If the broken bolt is at the #2 cylinder, you will probably will need a right hand drill attachment also.
Obstructive metal in the manifolds will need to be removed for the increase in horsepower. There are two areas of manifold restriction. The 1st is as follows. The obstructive material DOWN INSIDE the manifolds is the result of low cost/high tolerance manufacturing methods, and has nothing to do with the integrity of the manifold. One of the three ports is fine, but the two that T-Junction into the main tube have the obstructions. The 2nd source of obstruction are the weld beads that are located right at the entrance points (3 for each manifold). Just to clarify, hold a manifold such that you are looking inside one of the two T-junction ports. You'll see the slots in the main tube. The slot material is the MAIN obstruction. The 2nd obstruction is present in all 3 ports. Put your finger inside any of the three ports, and feel for a raised welded bead that is located right at the opening, where the tube itself is welded to the iron foot. I have measured the holes in the engine, and compared that dimension to the inside diameter of the manifold tube. They are about the same. The obstruction is the weld ring at the edge of the hole. Depending on the weld bead size, you'll have a "DECREASED" diameter between 1/8" to 1/4". I have found it necessary to first remove the ring bead, to increase the opening to get enough clearance for my router chuck inside to attack the slots. Remember what I previous stated. First take the manifold to the welder, and then grind out the material. You want the welder to ADD OUTER ring beads between the feet and the tubes, in all three areas. This is to reinforce the feet because you are going to weaken the inside welded areas at the openings.
I bought a 3/4" diameter, 1/4" shafted grinding wheel for about $4.00 to do the job. I used my 25,000rpm router to grind out the obstructive material in both areas, but I suppose you could get away with an electric drill. When you remove one of the manifolds, and examine it, everything will become clear concerning "what to remove". When shopping for the grinding attachment, make sure to get a cylindrical style grinding piece with a longer than usual 1/4" shank. I have found the best one for this job at an Ace Hardware. It spins so fast with the router that you get sparks, like a regular grinder. Wear good eye and ear protection.
If you are planning to grind out the welds at the iron feet, then I recommend taking it to a welding shop FIRST, before you start cleaning it out. When you get it back, the new welds will have penetrated through the stainless tube, and will need re-dressing. I also bought a 3/4" diameter, coarse wire wheel brush for the router. Using it when you are done grinding, will remove any imperfections left over. It polishes up the inside beautifully, eliminating any burrs. When shopping for these tools, make sure that they are rated for the speeds your router spins at. Total cost for them is around $12.00.
To minimize flatness problems from welding, give the welder the manifold bolted to FLAT hardwood, or better yet a steel block, or an old head from a junk yard. On my other, now sold GT, I just gave the first manifold to the welder, and got it back with the feet at all different angles. As for the 2nd manifold, I told him to clamp it down while welding. I saw that he did, but after he was finished, he disassembled it while it was still hot, and so the 2nd one twisted as it cooled. I had to sand down the iron feet with a belt sander the get the feet to lay flat. Don't make that mistake. Even with the hardwood or steel plate, you will have a little dressing up to do, but it will be a great improvement over doing nothing. I can't stress this enough, the feet must be flat so they seat flush with the engine head. I am convinced that if the iron feet do not rest flat up against the engine, there will be problems later with gasket failure, broken bolts, or cracks.
When removing the more difficult/front manifold, you will have to detach the air conditioner compressor assembly from the engine, but remain attached to the Freon lines. You should keep the compressor attached to the upper bracket. Trying to separate the two buys you nothing, and you will just have to reassemble the two together again anyway. If you have already tried to separate them, then tighten up both attachment bolts. The compressor WILL pivot, even when the two bolts are very tight. It is designed that way. There is never a need to loosen them in the first place. It is impossible to access these two bolts when the bracket and compressor are on the engine, so tighten them while the assembly is off the engine. The goal is to first remove the lower air conditioner bracket completely. Then unbolt the upper bracket from the engine, and rest the bracket/compressor assembly on a lower frame member, Freon lines in tact.
When you reinstall the air conditioning compressor, you may experience what I did. The top bracket has 3 bolts to the engine. When I removed them, the dog bone bracket that is behind the air conditioner bracket, shifted slightly just enough to give me a lot of grief. I tried and tried, and tried (and tried) to realign the upper air bracket, and it's top two bolts with the engine with NO SUCCESS. I went crazy! Everything appeared to line up perfectly, but in fact, the dog bone bracket moved so little that I could not get the bolts to thread in. If this happens to you, don't waste any time. Loosen the one big bolt that holds the two pieces of the dog bone bracket together. This will allow the self centering action needed to attach the upper air compressor bracket. You will have to use a huge screwdriver as a lever when tightening the compressor belt. It will take some strength, but it does work. The lower bracket has a string of slots, that help when using the screwdriver.
Good Luck!