Tech Tips: Installing Sprint Headers on V6...
 To begin with, the
vehicle I used was my 1986 SE. The car has the standard 2.8L V-6 and an automatic
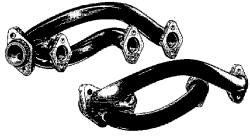
transmission. I decided to install the Sprint Racing Headers which are available from The
Fiero Store since no modifications to the existing exhaust system was needed. The headers
come with either a clear powder coat (which I chose) or for a small fee you can choose the
color of your choice or chrome. The headers match up very well to the heads and exhaust
"Y" pipe. Installing them is slightly tricky. I installed them without removing
the engine.
To begin with, the
vehicle I used was my 1986 SE. The car has the standard 2.8L V-6 and an automatic
transmission. I decided to install the Sprint Racing Headers which are available from The
Fiero Store since no modifications to the existing exhaust system was needed. The headers
come with either a clear powder coat (which I chose) or for a small fee you can choose the
color of your choice or chrome. The headers match up very well to the heads and exhaust
"Y" pipe. Installing them is slightly tricky. I installed them without removing
the engine.
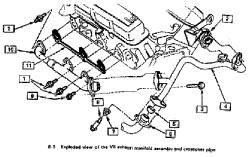
First is the removal of the original exhaust manifolds. Since I wasn't driving the car, I sprayed all the exhaust/manifold bolts with WD-40 about a week before. The rear manifold came off easily using a 1/2" socket and a wrench to get the one bolt next to the alternator. The "Y" pipe bolts are 10mm and require you to remove the heat shield between the coil and "Y" pipe. The front manifold was not so easy. You will need to raise the car to access the bottom manifold bolts. If you have the original catalytic converter, you need to remove the heat shield. I have a smaller less restrictive converter so reaching around it wasn't a problem. There is a heat shield over the manifold. The two top outside bolts and the bottom middle bolt have studs to hold the shield. (item 1 on figure). The nuts on these studs are the stamped type. In order to remove these you need a 1/2" deep well socket with a thin wall due to the raised edge of the shield. I used a 1/4" drive socket because the 3/8" is too thick. Lots of WD-40 helps.
 Once they are removed the
heat shield can be removed. But you cannot use the shield with the headers due to the
size. Also, I was cautioned by the Fiero Store not to wrap header tape around the headers.
They stated this can damage the headers. Next came the manifold. I loosened the top bolts
then went under to remove the bottom ones. The middle and right ones came off with no
problem but the left one is behind the A/C compressor. You also have a coolant pipe and a
large wire harness going across the back of the engine. I have heard that the V-6 has two
different size belts for the A/C and I know there are two types of A/C units listed. I
have the larger belt and can get my hand between the compressor and manifold. I did see an
engine out of a GT that the compressor was almost touching the manifold. This would
require removing the A/C compressor to access the bolt.
Once they are removed the
heat shield can be removed. But you cannot use the shield with the headers due to the
size. Also, I was cautioned by the Fiero Store not to wrap header tape around the headers.
They stated this can damage the headers. Next came the manifold. I loosened the top bolts
then went under to remove the bottom ones. The middle and right ones came off with no
problem but the left one is behind the A/C compressor. You also have a coolant pipe and a
large wire harness going across the back of the engine. I have heard that the V-6 has two
different size belts for the A/C and I know there are two types of A/C units listed. I
have the larger belt and can get my hand between the compressor and manifold. I did see an
engine out of a GT that the compressor was almost touching the manifold. This would
require removing the A/C compressor to access the bolt.
Next is installing the headers. First the header design makes access to the bolts
difficult with a socket. (see figure) All of mine were installed using a wrench. I used
new bolts which can be order thru the dealer, and I used all bolts no studs since the heat
shield could not be used. The headers have a slightly larger flange that attaches to the
head. This is only a problem at one spot. On the rear left side is a plate that has your
spark plug wire loom. It is attached via a head bolt. I just bent the plate up a little so
the header would fit. The next problem was installing the header bolts. With an automatic
transmission you cannot access the bottom bolts of the rear header from under the car. (If
you have a manual trans this is not a problem). So I had to put in the bottom bolts from
the top. The space between the head and headers allows you access to the bolts with a
wrench. The one by the alternator went on 1/4 turn at a time! Next is the "Y"
pipe connection. The original manifolds had a nut welded to the flange and the headers do
not. So off to the hardware store for four, 2" long, 3/8" bolts with washers and
nuts. One on one to go. For the front header you need to remove the 8mm bolt holding your
oil dip stick in order to install the gasket behind the dipstick tube. The gasket won't
fit otherwise. I then installed the header top bolts. Next was to go under and install the
bottom bolts. The hard one is now the middle bolt because the header is about 1/2"
away from the coolant pipe. Back up to the topside to install the middle bolt. The
"Y" pipe was then connected.
Finally, I made sure nothing was touching the headers (harnesses, spark plug wires, etc).
I started the engine and checked for exhaust leaks. None were found so the test drive
began.
The performance of the car was improved. Most noticeable was at the low and middle rpm range.
Throttle response was better and acceleration was smoother. I do not have specific time increases, but 0 to 60 seems better. Idle is smooth and steady. I have not noticed any heat increase in the engine compartment. In all, I am happy with the results and they look great even though the cost of the headers ($437.95) is on the high side.
If you decide to install the headers and have questions or need help I can be reached via E-mail by clicking my name above.